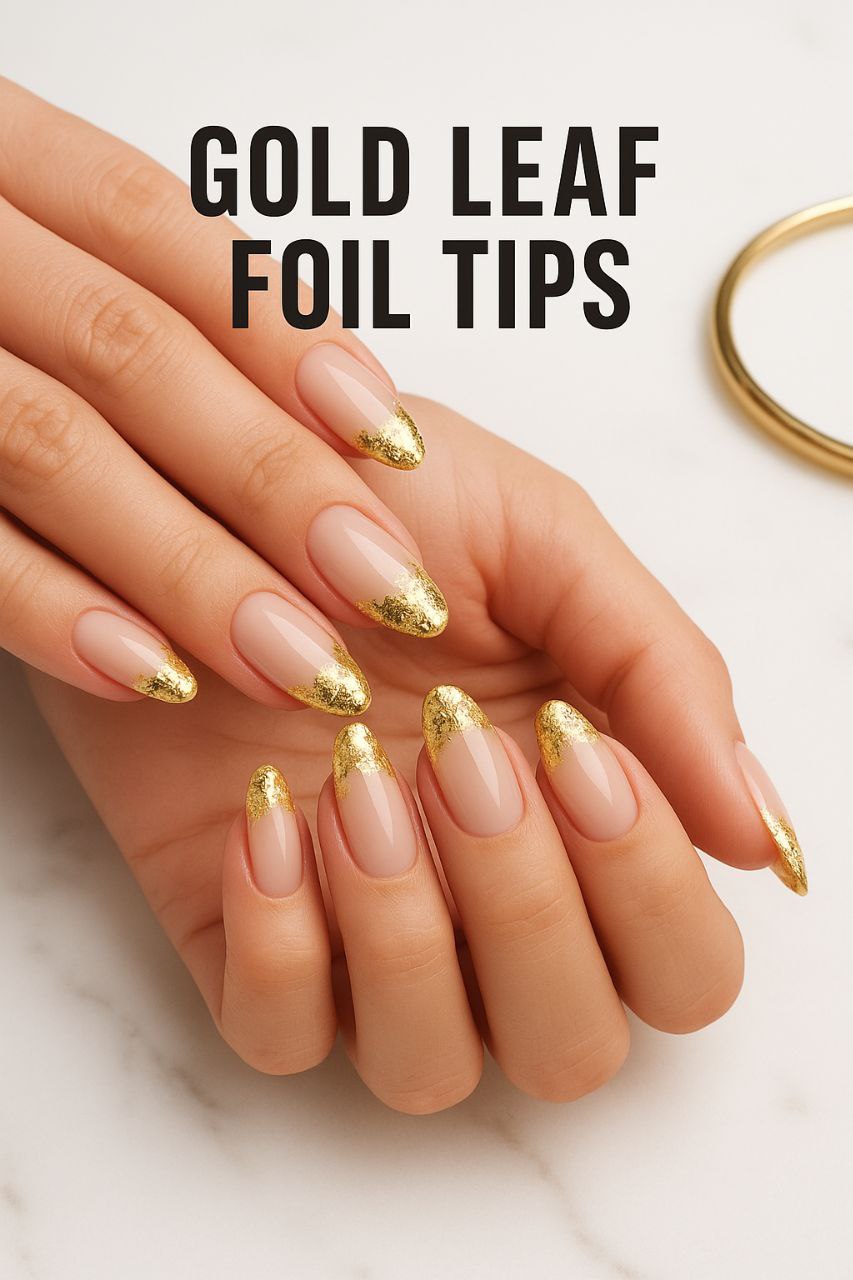
Introduction: How I Fell in Love with Gold Leaf Foil Tips 💛
Okay, confession time. I’ve always loved nails that make me stop and stare at my own hands. Seriously—call it vanity, call it self-care, whatever. But one afternoon, I was scrolling Instagram, half-distracted, while my toddler was “helping” me sip coffee (read: spilling it on my laptop), and I saw these nails. Gold, crinkled, shiny… like little shards of sunlight glued to someone’s fingertips. And just like that, I was obsessed.
I remember thinking: How is this real life? Can my nails ever look this luxe without me needing an entire salon appointment every week?
So yeah, I dove in. I bought my first foil sheets, some cheap gel polish kit, and armed with nothing but determination (and about 45 minutes before bedtime), I attempted my first gold leaf foil manicure. Spoiler alert: it was a disaster. One nail looked decent, the others… let’s just say my toddler could’ve made better shapes with his finger paint. But I learned a ton.
Here’s the thing: gold leaf foil tips are not just about shiny nails. They’re about the tiny moments you steal for yourself in the chaos of everyday life, the little spark of joy you get when sunlight hits your nails just right. And honestly? That’s exactly why I keep doing them.
The First Try: Lessons Learned (And Why I Almost Gave Up)
I’ll be honest—my first attempt was messy. I had pieces sticking out, edges curling, and I ended up peeling some off after two hours because I couldn’t handle the jagged foil scratching my sweater. I felt frustrated.
But here’s the funny part: my kid thought it was hilarious. Every time I waved my hands, he would giggle and say, “Shiny, Mommy!” And in that moment, I realized—it’s not about perfection. It’s about experimenting, having fun, and letting yourself enjoy a little sparkle amidst the chaos.
That’s when I decided I’d actually learn how to do it properly. Not the rushed, “I’ll just slap it on” version. I watched tutorials, practiced on fake nails, and slowly, the foil started cooperating with me instead of against me.
Why Gold Leaf Foil Tips Are Worth It
Now that I’ve nailed the technique (pun intended), I get asked all the time: “Why bother with gold leaf foil when regular polish works fine?”
Well, let me tell you:
- Every nail feels unique. Unlike glitter, which is uniform, foil bends and crinkles differently every time. No two nails are ever the same.
- It’s surprisingly versatile. One day, I wear a soft nude with subtle gold flecks. The next, full gilded tips for a Zoom meeting where I need a confidence boost.
- It’s like tiny jewelry for your hands. And honestly, as a mom, sometimes that little sparkle is all the adulting affirmation you need.
💡 Real-life tip: I pair my gold leaf nails with a fresh coat of cuticle oil. It makes the foil pop even more and keeps my hands looking polished even after endless diaper changes and coffee spills.
How I Finally Mastered Gold Leaf Foil Tips 💅
Tools and Materials I Swear By
When I first started, I thought I could wing it with whatever was lying around my nail kit. Big mistake. Here’s what I now consider essential:
- Gold leaf sheets or flakes – I like the kind that comes in small squares; easier to handle, less mess.
- Tweezers or a silicone brush – your fingers will not cut it. Trust me.
- Base coat – this saves your natural nails from staining.
- Gel polish – clear or colored, depending on your vibe.
- Top coat – preferably a no-wipe gel for durability.
- Patience – seriously, don’t skip this one.
💡 Tip from experience: I learned the hard way that foil pieces stick better to a slightly tacky surface. Too wet and it slides everywhere, too dry and it won’t adhere. So, timing is everything.
📸 Insert image here: Flat lay of all tools and gold leaf sheets on a coffee table.
Prepping Your Nails: The Real Deal
I can’t stress this enough—prep makes or breaks your mani. When my nails were oily or uneven, foil refused to cooperate. After a few disasters (hello, peeling edges and jagged foil), I found a routine that works even with toddlers interrupting every five minutes.
- Trim and shape – I like a soft almond shape, but square works too.
- Buff lightly – don’t overdo it; just smooth out ridges.
- Push back cuticles – and yes, some of us have toddlers tugging at our hands while doing this. Been there.
- Clean thoroughly – a swipe of alcohol removes oils, giving your foil something to cling to.
Honestly, this part feels tedious, but once it’s done, the foil practically glues itself.
📸 Insert image here: Close-up of prepped nails before foil application.
Applying Gold Leaf Foil: My Tried-and-True Method
Now comes the fun part (and sometimes the frustrating part).
- Base coat first – cure it if you’re using gel.
- Apply your polish – I usually go nude, blush, or deep plum depending on the season.
- Pick your foil – use tweezers to grab tiny pieces. Smaller is better; big chunks are awkward and snag on everything.
- Place irregularly – don’t stress about perfection. That crinkled, uneven look is what makes it chic.
- Seal it in – top coat time! I do two layers for long-lasting shine and smoothness.
Mini story: The first time I tried to cover a whole nail with one piece of foil, it folded over itself like a bad origami project. I spent 20 minutes trying to flatten it. Lesson learned: tear small pieces, place loosely, and let the natural randomness work its magic.
💡 Pro tip: For a gradient effect, concentrate foil at the tips and gently fade downward. It looks effortlessly luxurious, even if your toddler spills juice mid-application (again, speaking from experience).
📸 Insert image here: Step-by-step images showing foil placement on nail.
Personal Hacks That Save Me Every Time
- Silicone tool over fingers: Keeps the foil from sticking to your skin.
- Top coat before messing with the housework: Trust me, wiping counters and touching snacks will ruin your shiny edges otherwise.
- Accent nails only sometimes: A single nail with foil looks way more elegant and takes less time when you’re juggling kids, emails, and laundry.
Honestly, the first few tries felt intimidating. But once I got my groove, it became my little “me time” in the chaos of motherhood. I even look forward to it now—it’s like crafting with sparkly gold while sipping my latte in peace for five glorious minutes.
Creative Gold Leaf Designs That Make Me Obsessed 😍
Gold leaf foil tips aren’t just about slapping gold on your nails—they’re tiny canvases for your personality. I’ve tried a bunch of styles over the past year, and honestly, some flopped hilariously (I’m looking at you, “full foil on all ten nails” disaster). But some became instant favorites.
1. Subtle Accent Nails: My Everyday Go-To
When I’m running errands, chasing a toddler, and trying to sip coffee before it goes cold, subtle accent nails are my lifesaver.
- What I do: Nude or soft blush base, one or two nails with small foil flakes.
- Why it works: Minimal effort, maximum sparkle. People compliment without thinking it’s over-the-top.
- Mom-hack: I can even touch baby’s toys or clean the counter without worrying about smudges.
Mini story: One morning, I had foil only on my ring fingers. My son tapped them and said, “Mommy, your fingers are shiny magic!” I nearly cried. That’s the kind of little joy these nails bring.
📸 Insert image here: Nude nails with subtle gold foil accent on one finger.
2. Gilded French Tips: Classy Meets Fun
French tips with a twist—gold foil instead of white polish—are my “I’m fancy but also a mom” choice.
- Technique: Base coat + neutral polish, small foil at tips only, top coat to seal.
- Why I love it: Looks professional, lasts longer, and pairs with literally any outfit.
- Personal note: I wore this style to a Zoom meeting once, and even my usually unobservant coworkers noticed. Confidence boost = priceless.
📸 Insert image here: Almond-shaped nails with foil French tips.
3. Bold Color Contrast: Night-Out Glam
Sometimes, a mom needs to feel like she still has a nightlife. Even if that nightlife is “kids asleep by 8 pm, Netflix on.”
- My favorite combo: Deep navy, burgundy, or black polish + gold foil tips or random flakes.
- Effect: Dramatic, edgy, totally Instagram-worthy.
- Storytime: One Friday night, I painted all my nails dark burgundy with gold flakes. My husband walked in, paused, and said, “Wow… those are fancy.” I felt like a queen for 10 minutes straight. Worth it.
📸 Insert image here: Dark base nails with bold gold foil flakes.
4. Marble + Gold Veins: Artistic AF
This one is for when I feel extra creative.
- How I do it: Marble base (white + gray swirls) and thin strips of gold foil to mimic natural marble veins.
- Why it’s special: Looks like you paid hundreds at a salon, but it’s DIY-friendly.
- Mom-hack: Start small; even one marble foil nail among plain nails gives a luxe effect.
Mini anecdote: I tried doing a full set once, and my toddler kept tapping the wet nails and leaving tiny fingerprints. Accidentally added a “custom pattern.” Honestly, it looked amazing—sometimes imperfection is perfection.
📸 Insert image here: Marble-inspired nails with thin gold veins.
5. Minimalist Flecks: The “Less Is More” Approach
Not every day calls for dramatic glam. Some mornings, coffee in hand, I just want subtle sparkle.
- Technique: Clear or soft-colored base + tiny random foil pieces scattered sparingly.
- Why I like it: Quick, low-maintenance, and gives a polished look without screaming, “I did my nails for hours!”
- Pro tip: I often do these on short nails; they make hands look elegant and elongated.
My Personal Styling Insights
Here are a few things I’ve learned after countless mani sessions, toddler interruptions, and spilled coffee moments:
- Don’t overthink placement: The beauty of gold leaf is its irregularity. Perfection is overrated.
- Use accent nails strategically: One or two nails can carry the whole look.
- Top coat is your BFF: Even after a week of chaos, two layers keep foil in place.
- Experiment with shapes: Almond, oval, square—they all give a different vibe with foil.
💡 Story snippet: Last month, I was prepping for a small girls’ night in. I threw on a subtle nude base with foil flecks on two nails. By the time everyone arrived, I got so many compliments. I even caught myself admiring my hands mid-snack prep. Those little moments of self-love? Totally worth the 20 minutes of effort.
📸 Insert image here: Collage of various gold leaf nail designs with close-ups.
Keeping Your Gold Leaf Foil Tips Gorgeous (Even With Kids Around) ✨
One thing I quickly realized as a mom: your nails are going to face some serious challenges. Juice spills, diaper duty, grocery bags—basically, anything that threatens your manicure. But don’t worry, I’ve figured out how to keep my gold leaf foil nails looking fab, even in chaos.
Maintenance Tips That Actually Work
- Top coat is non-negotiable: I apply two layers every 5–7 days. Keeps the foil flat and shiny.
- Cuticle oil daily: Not just for moisturizing; it makes the gold pop and keeps nails healthy.
- Hands-on chores? Gloves: I’ll admit it, I’m guilty of skipping this sometimes, but dishes and cleaning with bare hands will dull the foil fast.
- Quick touch-ups: A tiny foil flake can lift? Just tuck it back down with a brush and seal with top coat. Easy.
Mini story: One morning, I was on a conference call while my toddler painted the living room walls with “art” (aka spaghetti sauce). I noticed my foil lifting… two swipes of top coat later, and no one would’ve guessed. Mom life, am I right?
📸 Insert image here: Hand applying cuticle oil on gold leaf foil nails.
Troubleshooting Common Foil Fails
Even after mastering application, stuff happens:
- Edges peeling: Usually because the foil piece was too big. Solution? Smaller pieces + firm press + extra top coat.
- Bubbles under foil: Happens when polish isn’t fully tacky. Patience, my friend. Let it sit for a few seconds.
- Foil sliding: Use tweezers or silicone tool, not fingers. I learned this the hard way—hello, foil on my sweater.
💡 Real-life tip: Sometimes imperfection is okay. My toddler once added fingerprints to wet foil. Weirdly, it looked like a custom design. Embrace happy accidents.
DIY vs. Salon: What Works Best for Moms
I’ve tried both. Here’s my take:
| Approach | Pros | Cons | Mom-Friendly Notes |
|---|---|---|---|
| DIY | Affordable, flexible, creative | Takes patience, messy | Great for quiet nap time sessions, allows experimentation |
| Salon | Professional finish, long-lasting | Expensive, appointment needed | Perfect for special events or when patience = zero |
Honestly, I do DIY most of the time, because it’s therapeutic. But for a wedding or a fancy night out? Salon gold leaf nails feel worth every penny.
Seasonal Inspiration: Matching Your Nails to Life & Fashion
- Spring: Nude base + delicate gold flecks. Fresh, airy, and toddler-approved.
- Summer: Bright colors with scattered foil. Fun, vacation vibes—even if the “vacation” is backyard playdates.
- Fall: Deep plums, burgundy, or forest greens with gilded tips. Cozy and chic.
- Winter: Dark base + full gold foil for holiday glam. Bonus: makes you feel festive even if the kids are destroying the wrapping paper.
📸 Insert image here: Seasonal nail inspiration collage.
Mom Hacks for Effortless Glam
- Foil on just one or two nails: Minimal fuss, maximum sparkle.
- Prep nails while watching cartoons: Multitasking like a pro.
- Use leftover foil scraps creatively: Tiny flecks scattered on a clear base for quick touch-ups.
- Coffee table setup: Keep all your tools in one spot. If a toddler sees glitter, disaster avoided.
Mini anecdote: Last Tuesday, my toddler spilled juice all over my freshly painted nails while I was doing a Zoom call. I calmly cleaned it up, reapplied a tiny top coat, and honestly, no one would’ve guessed. These little hacks save manicures and sanity.
Reflections, Encouragement, and Everything You Need to Know About Gold Leaf Foil Tips 💖
After months of experimenting, failing, and laughing at my own messy attempts, I can honestly say: gold leaf foil tips are more than just nails—they’re little confidence boosters. They remind me that even in the chaos of motherhood, I can carve out tiny moments just for myself.
My Personal Takeaways
- It’s okay to be imperfect: Some nails will have crinkles or uneven edges. That’s the beauty of foil—it’s supposed to be unique, just like us.
- Patience pays off: The first attempts might be frustrating, but once you find your rhythm, it’s relaxing and even therapeutic.
- Self-care doesn’t need hours: Ten minutes while your kid is napping or watching a show can be enough for a full, gorgeous mani.
- Accessorize with confidence: I’ve gotten compliments even from strangers, and honestly, it feels amazing. A little gold on your nails = instant mood lift.
Encouragement for Other Moms
Listen, I get it. Between laundry, meals, Zoom calls, and tantrums, carving out time for yourself can feel impossible. But here’s the thing: these little moments of sparkle matter. They’re not just nails—they’re tiny celebrations of YOU.
I promise, even if your toddler spills juice, your dog insists on climbing your lap, or you forget a top coat once in a while—it’s okay. That little shimmer on your nails is still yours.
Mini story: One chaotic morning, I painted my nails with foil on just two fingers. My daughter noticed and said, “Mommy, your hands look magical!” I nearly cried. It reminded me that self-care is also about joy, not perfection.
FAQ: Everything I Wish I Knew Before Trying Gold Leaf Foil Tips
Q1: How long do gold leaf foil nails last?
A: With gel polish, about 2–3 weeks; with regular polish, 5–7 days. The trick is a solid top coat and proper prep.
Q2: Can I use real gold leaf?
A: Totally! Real gold is pricier but lasts longer and gives a luxe finish. I usually stick to imitation sheets because toddler-proof.
Q3: Can I do foil on short nails?
A: Absolutely. Tiny nails + small foil pieces = super elegant. In fact, I find it easier to manage than long nails during mom life chaos.
Q4: What’s the easiest style for busy moms?
A: Accent nails or minimal flecks on a neutral base. Quick, low-maintenance, and still fancy.
Q5: Can I DIY at home?
A: Yes! But patience is key. A silicone brush, tweezers, and a little free time while the kids nap make a world of difference.
Final Thoughts: Why I’ll Never Stop Loving Gold Leaf Foil Tips ✨
I’ve tried every polish trend under the sun—glitter, chrome, metallics—but gold leaf foil nails are different. They’re luxurious, unique, and playful all at once, and they’ve taught me to appreciate the small joys in motherhood.
Every time I glance at my nails while juggling snacks, school drop-offs, and work emails, I get a tiny spark of “me-time” happiness. And honestly? That little sparkle is priceless.
So yeah, moms, give yourself permission. Grab a few sheets of foil, a bottle of polish, and a quiet ten minutes. Experiment. Mess up. Laugh. And then look at your hands and realize: you just made magic happen.
📸 Insert image here: Full set of gold leaf foil tips under natural light, hands in cozy coffee cup shot.

Olivia Bennett
Hi, I’m Olivia Bennett, the creator of Styleandbeauty101. I started this blog to share my love for beauty, haircare, and skincare with women across the worldwide.
Here, I share practical routines, product reviews, tutorials, and trend insights designed to make beauty feel simple and fun. My goal is to help you discover what works best for your lifestyle so you can feel confident every single day.
Beyond blogging, I love experimenting with DIY beauty recipes, learning about cultural beauty rituals, and connecting with my amazing readers on social media.