Why Halloween Nails Make Me Feel Like a Kid Again
Okay, I have to admit something. Every October, I get this weird urge to completely redecorate my hands. I don’t even mean the house—my nails. And yes, I’m a mom, which means I barely have 10 minutes to brush my hair, let alone sit for a two-hour nail appointment. But somehow… I always find time for Halloween Black & Orange Nail Designs .
Last year, I was juggling my 5-year-old, a Zoom call, and a bag of candy when I decided, “Why not?” I slapped on some glossy black polish, dragged a bobby pin across the orange nail polish for a tiny spiderweb, and somehow, it worked. Not perfect, not Pinterest-worthy, but real. And honestly? I got like three compliments in one hour while wearing sweatpants and a hoodie. Nails = instant Halloween glam.
There’s something about black and orange that feels so Halloween. Orange is warm, cozy, pumpkin-y. Black? Mysterious, spooky, a little dramatic. Together, they’re like the PSL of nail colors: you can’t ignore them, they’re festive, and they just feel right.
Honestly, who has time for a 10-step nail routine when you’re running between soccer practice and pumpkin patch trips? Not me. And that’s why I’m writing this guide—to show you how to get cute, fun, and slightly spooky Halloween nails without losing your mind.
Table of Contents
- Why Black & Orange Nails Are the Ultimate Halloween Duo
- 2025 Trends in Halloween Black & Orange Nail Designs
- Minimal Chic
- Bold Glam
- Cute & Playful
- DIY Designs You Can Actually Pull Off at Home
- Salon Designs That Are Totally Worth It
- Nail Shapes & Why They Matter
- How to Make Your Halloween Nails Last (Even With Kids)
- Styling Your Nails With Your Halloween Costume
- Beyond Pumpkins & Bats: Fresh Ideas
- Nail Care After Halloween
- FAQ Section
- Conclusion + My Personal Tips
🖤🧡 Why Black & Orange Nails Are the Ultimate Halloween Duo
Let’s get real. Black and orange isn’t just a color combo—it’s a mood.
- Orange = pumpkins, autumn, cozy sweaters
- Black = mystery, night, witches’ hats, spooky vibes
- Together = instant “Halloween is here” energy
I’ll never forget the year I tried neon green and purple nails for Halloween. Don’t get me wrong—they were fun, but nothing popped like classic black & orange. My toddler pointed and yelled, “Mommy! Pumpkins!” And I realized, yep, this is the universally recognized Halloween palette.
Another mom tip? If you’re pale like me, a muted pumpkin orange or a burnt copper works better than neon. It still pops against black polish, but it doesn’t make your fingers look like traffic cones.
And the best part? You don’t need crazy designs. You can literally do half black, half orange, add a tiny spider web on your ring finger, and suddenly you’ve got a festive manicure.
🔮 2025 Trends in Halloween Black & Orange Nail Designs
Okay, 2025 is stepping things up. Gone are the days when Halloween nails meant glitter overload or sticker chaos. This year, we’re talking texture, dimension, and a little subtle magic.
Minimal Chic
Perfect if you’re busy and still want cute nails:
- Skinny French tips with black on top and a thin orange line underneath
- Matte orange nails with a single glossy black accent finger
- Negative space moons with tiny spiderweb corners
Personal confession: I tried this last year while packing lunches, and I got halfway through making PB&J sandwiches before smudging one nail. But honestly? Imperfect nails are kinda charming.
Bold Glam
For the “I want people to notice my nails” crowd:
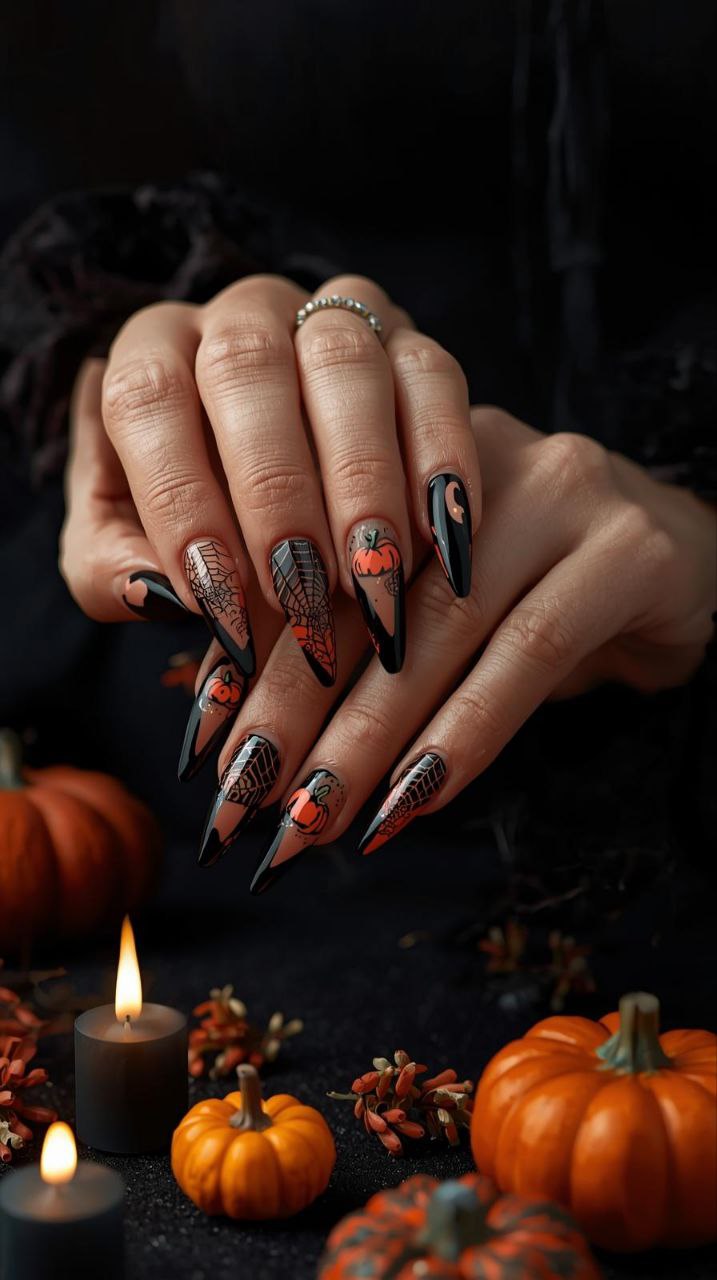
- Chrome black nails with fiery orange flames at the tips
- Coffin-length nails painted neon orange with matte black fade
- Tiny 3D pumpkins or bat charms glued on for extra drama
- Ombre blends from black at the cuticle to orange at the tip
I saw a mom at Target last October with coffin nails, black matte with dripping orange accents. Everyone was staring. Even her toddler was impressed (or terrified, hard to tell).
Cute & Playful
If you want your nails to be fun without scary vibes:
- Tiny smiley pumpkins
- Little cartoon ghosts on orange nails
- Candy corn gradients (white → orange → black)
- Glitter jack-o’-lantern faces
I love doing these with my daughter. She picks which finger gets a ghost and which gets a pumpkin. Total bonding time, plus we both look like Halloween geniuses.
💅 DIY Designs You Can Actually Pull Off at Home
Now, let’s be real. Not everyone has time or budget for a salon. And honestly? Some of the best Halloween nails I’ve done were DIY disasters turned cute.
Tools I Actually Use
- Black polish (matte + glossy)
- Orange polish (burnt + bright)
- Base + top coat
- Toothpick or bobby pin
- Dotting tool (or a pencil eraser in a pinch)
- Cotton swabs for clean-up
Mom confession: I once painted my nails while holding a toddler and spilled black polish on the counter. My kitchen still has a little black streak. It’s fine… totally fine… if you ignore it.
Easy DIY Ideas
- Toothpick Spiderwebs
- Paint nails orange
- Drag thin black lines into a web
- Seal with clear top coat
- Half & Half Nails
- Split nail in black & orange
- Use tape for a clean line
- Glitter down the middle for a little drama
- Pumpkin Dots
- Black base
- Orange circles
- Tiny green stems with a toothpick
Honestly, that last one got me the most compliments. People thought I’d spent hours. It took me 15 minutes while my toddler napped. Win-win.
💎 Salon Designs Worth Splurging On
Okay, listen. DIY is fun, but sometimes… you just need that professional touch. Especially if you’re going to a Halloween party or snapping pics for the ‘gram. Trust me, there’s nothing like walking in with sticky floors and tiny humans all over the place and walking out with nails that look like magic.
Here’s what’s trending in salons this year:
- Coffin Nails with Orange Flames: Matte black base, shiny orange flames licking up the tips. I tried to DIY this once and… let’s just say, my flames looked more like sad squiggles. Lesson learned: leave it to the pros.
- 3D Charms & Mini Pumpkins: Little pumpkins, bats, or spider charms glued right onto your nails. Instant drama. Last year I had tiny pumpkins on my ring finger—it made my coffee sip feel fancy.
- Glow-in-the-Dark Designs: Perfect if you have kids running around at night and want your nails to match the spooky vibe. Bonus: they’re hilarious when your toddler points and screams, “Mommy, your fingers are glowing!”
- Matte Black + Glossy Accents: Minimal but elegant. The contrast is surprisingly eye-catching. Great for those of us who don’t want our nails to scream “look at me” but still want festive flair.
Pro tip: If you’re going to a salon, bring a reference photo. Trust me, it saves you from the “Oh… I thought you meant neon” disaster. I once showed a picture of matte orange flames, and they made them neon. Neon! I looked like a traffic cone instead of a chic witch. Not fun.
🔺 Nail Shapes & Why They Matter
Here’s the thing: the shape of your nails can make or break your Halloween design. I’ve learned this the hard way. Last year, I did stiletto nails for the first time… and yes, I stabbed myself three times while carving pumpkins.
Here’s a quick guide:
| Nail Shape | Best For | Mom-Proof? |
|---|---|---|
| Coffin / Ballerina | Glam designs, long nails, drama | Medium |
| Almond | Elegant, elongates fingers | High |
| Stiletto | Bold, edgy, statement nails | Low |
| Square | Classic, easy to maintain | Very High |
| Round | Short nails, practical | Very High |
My take: If you have small kids or pets, I’d stay away from stilettos. Coffin or almond gives you elegance without constant “Ouch!” moments. Square or round nails? Mom-approved. You can still do cute Halloween designs without getting poked in the arm during snack time.
🕸️ How to Make Your Halloween Nails Last
Alright, here’s the real tea: Halloween nails get a beating. Trick-or-treat candy, carving pumpkins, toddler chaos… it’s a miracle they survive. But with a few tricks, you can keep your manicure looking cute all month.
- Prep is everything: Buff nails, push back cuticles, and always use a base coat. I know it sounds extra, but it actually helps. Last year I skipped it… and my nails chipped after a single pumpkin. Rookie mistake.
- Top coat magic: Seal everything with a good top coat. Reapply every 2–3 days if possible. I do this while sipping coffee during nap time—it’s like my little self-care ritual.
- Pumpkin carving gloves: Yes, you’ll look like a dork. But your nails will thank you. I once carved a pumpkin with bare hands and cried when my black polish chipped in minutes.
- Be gentle with washing: Dish soap + scrubbing = nail nightmare. I use gloves when washing dishes or doing arts and crafts with the kids. Helps keep polish intact.
- Touch-up station: Keep your black and orange polish handy. Honestly, I have a mini kit by the sink for last-minute “oh no!” moments. It’s saved me more than once.
Mini story: One Halloween, my 3-year-old spilled orange juice all over my newly painted nails right after I finished them. I sat there, crying a little, then grabbed my mini polish kit and fixed them while he drew with markers. Chaos + polish = survival skills.
🧡 Styling Your Halloween Nails With Your Costume
Here’s the thing: nails can totally make or break your Halloween look. I’ve had plenty of years where I spent hours on my outfit and then realized my nails were… boring. Total tragedy.
So here’s my mom-approved guide:
Witchy Glam
- Matte black nails with glossy orange tips or subtle glitter.
- Add a spider web accent on the ring finger.
- Works perfectly with black dresses, witch hats, or pointy boots.
- Personal moment: I wore this to a school Halloween party, and my son proudly announced, “Mommy, your fingers look scary cool!” Nothing beats a kid complimenting your nails.
Cute Pumpkin Patch
- Burnt orange nails with tiny smiley pumpkin faces.
- Pair with plaid shirts or cozy sweaters.
- Add a little gold glitter for that magical “sunset pumpkin patch glow.”
- Bonus: perfect for toddler photos and mommy-baby costume matching.
Glam Black-Dress Party
- Glossy black nails with orange French tips or black ombre fading into orange.
- Perfect for evening parties where you want to look chic but festive.
- Tiny rhinestone accents make it feel luxe without overdoing it.
💡 Mom hack: If you’re pressed for time, do accent nails instead of painting all ten. Even one or two Halloween-themed nails make the whole set pop.
🌙 Beyond Pumpkins & Bats: Fresh Inspiration
Okay, let’s get creative. Halloween nails don’t have to be basic pumpkins or ghosts. I’ve experimented with some offbeat designs that were surprisingly fun:
- Tarot-Inspired: Black nails with orange crescent moons or little stars. Makes me feel mystical while running errands.
- Black Lace: Matte orange base with intricate black lace designs—perfect for a more elegant, adult vibe.
- Abstract Flame Ombre: Orange flames over a black base, slightly messy on purpose. I call this “chaotic mom chic.”
- Glow-in-the-Dark Accents: Tiny dots or spider webs that pop when the lights go out. My 7-year-old thinks I’m a wizard every time.
🌿 Nail Care After Halloween
Now, the aftermath. After candy, carving, and costume chaos, your nails need some TLC. Here’s my post-Halloween routine:
- Gentle removal: Use a non-acetone remover if possible to avoid drying out nails.
- Cuticle hydration: I massage coconut oil into my cuticles nightly for a week. Totally worth it.
- Strengthening base coat: Gives nails a little break before you start the next mani.
- Glitter removal survival: Pro tip: soak nails in warm soapy water first, then gently remove glitter polish. Trust me, this saves hours.
- Mini manicure reset: Even just a quick buff and clear top coat makes your nails feel normal again.
💡 Funny story: Last Halloween, I left glitter polish on my nails until Thanksgiving. My husband kept finding sparkles in his socks. Mom life, am I right?
❓ FAQ Section
Q: How do I prevent orange polish from staining my nails?
A: Always use a base coat, preferably one with a slight tint. I’ve learned the hard way that skipping this step leads to nails looking neon-even-after-removal.
Q: What nail shape is best for Halloween designs?
A: Coffin or almond is great for long dramatic looks, but round or square nails are perfect for moms who need practicality without losing style points.
Q: Can I reuse Halloween press-ons?
A: Totally! Just clean and sanitize them. They’re great for last-minute parties or lazy nail days.
Q: What’s the easiest design for beginners?
A: Half & half nails, pumpkin dots, or a single accent nail with a spider web. Minimal tools, max impact.
🎃 Conclusion + My Personal Tips
So here’s the deal: Halloween nails don’t need to be stressful. Whether you DIY while your toddler is napping or hit the salon for full-on glam, black & orange nails are your easiest shortcut to festive style.
Personally, this year I’m doing matte black coffin nails with glossy orange flame tips and a single tiny bat on my ring finger. It’s bold enough to be fun but still mom-friendly.
Mom-approved tips:
- Accent nails are your best friend.
- Keep a mini polish kit handy for quick fixes.
- Don’t stress perfection—slightly messy designs look handmade and unique.
- Most importantly, enjoy it. Halloween is chaotic enough; your nails should be fun, not stressful.
💡 Tiny personal story: Last year, my nails got smudged during pumpkin carving, but my son loved helping me “fix” them. We laughed, took photos, and honestly, it made the whole experience better than if they’d been perfect.
So grab your black & orange polish, channel your inner witch, and embrace the chaos. Your nails can be the cutest part of Halloween—even if your costume is just a hoodie and some cat ears.

Olivia Bennett
Hi, I’m Olivia Bennett, the creator of Styleandbeauty101. I started this blog to share my love for beauty, haircare, and skincare with women across the worldwide.
Here, I share practical routines, product reviews, tutorials, and trend insights designed to make beauty feel simple and fun. My goal is to help you discover what works best for your lifestyle so you can feel confident every single day.
Beyond blogging, I love experimenting with DIY beauty recipes, learning about cultural beauty rituals, and connecting with my amazing readers on social media.